

ဒီ Project မှာတော့ Google Chrome ရဲ့ နာမည်ကြီး ဂိမ်းလေးဖြစ်တဲ့ Chrome Dino ပုံစံ ဂိမ်းလေးကို ရေးမှာဖြစ်ပါတယ်။ ဒီ Project လေးက Web development ကို အခုမှ စလေ့လာတဲ့ Beginner တွေ အတွက် ရည်ရွယ်တာဖြစ်လို့ HTML CSS ကို သိထားရုံနဲ့ လိုက်ရေးလို့ ရပါတယ်။ JS အခြေခံနည်းနည်း သိထားရင်တော့ ပိုအဆင်ပြေပါတယ်။ ဂိမ်းမှာ အသုံးပြုမယ့် Sources တွေကို အောက်မှာပေးထားတဲ့ Github link ကနေ ရယူနိုင်ပါတယ်။ ဂိမ်းလေးကို ရေးပြီးရင် သူငယ်ချင်းတွေနဲ့ Share လို့ရအောင် Github Page မှာပါ တစ်ခါတည်း တင်မှာဖြစ်ပါတယ်။
Play Jumping T-rex –> Game Demo
Source –> Github Link
What you will learn
ဒီဂိမ်းလေးကို ရေးရင်းနဲ့ အဓိကလေ့လာသွားမယ့် အရာတွေကတော့
- CSS ဖြင့် Animation များ ရေးဆွဲခြင်း
- HTML element များကို Object များအဖြစ် အသုံးပြုခြင်း
- Game state များအလိုက် Page ကို ပြောင်းလဲပေးခြင်း
- Data များကို Session Storage တွင် သိမ်းဆည်းခြင်း
- Game ကို Github Page တွင် Upload လုပ်ခြင်း
Building Game Window
HTML Structure
အရင်ဆုံး HTML ကို ရေးပါမယ်။
<!DOCTYPE html>
<html>
<head>
    <meta charset="utf-8">
    <title>Dino Jump</title>
    <link rel="stylesheet" type="text/css" href="dino.css">
    http://dino.js
</head>
<body>
    <div class="container">
        <div id="status">
            <div id="hiscore">BEST: 0</div>
            <div id="info"><h2>Dino Jump</h2></div>
            <div id="score">SCORE: 0</div>
        </div>
        <div id="bg"></div>
        <div id="dino"></div>
        <div id="spike"></div>
    </div>
</body>
</html>
ဒါကတော့ ဒီဂိမ်းအတွက်လိုအပ်တဲ့ HTML ပါ။ Body ထဲမှာ Game screen ကို ပြမယ့် အဓိက container တစ်ခုရှိပါမယ်။ အဲဒီအထဲမှာ Score တွေကိုပြမယ့် Status bar ရယ်၊ Game အတွက်လိုအပ်တဲ့ background နဲ့ sprites တွေ အတွက် div သုံးခုရယ် ရှိပါမယ်။
CSS Styling
ပြီးရင်တော့ CSS ကို ဆက်ရေးပါမယ်။
* {
    margin: 0;
    padding: 0;
    box-sizing: border-box;
}
body {
    height: 100vh;
    background-color: #a0522d;
    font-family: 'Comic Sans MS';
    font-size: 1.5em;
    font-weight: bold;
}
.container {
    width: 100%;
    height: 80vh;
    position: relative;
    overflow: hidden;
    border-bottom: solid 8px #ffd180;
    background: #0084ff;
}
.status {
    width: 100%;
    padding: 2px 10px;
    left: 0;
    top: 0;
    position: absolute;
    display: flex;
    justify-content: space-between;
}
#info {
    font-size: 2em;
    text-shadow: 1px 2px #000;
}
#dino {
    width: 10%;
    height: 120px;
    background: #25d366;
    position: absolute;
    bottom: 0;
    left: 100px;
}
#spike {
    width: 10%;
    height: 80px;
    background: #cd201f;
    position: absolute;
    bottom: 0;
    left: 1000px;
}
ဒီ CSS တွေကတော့ Game window နဲ့ Element တွေကို နေရာချတာပါ။ ကိုယ်နှစ်သက်သလို ရေးနိုင်ပါတယ်။ ဒီအထိ ရေးပြီးလို့ Browser မှာ ဖွင့်ကြည့်လိုက်ရင် အောက်မှာ ပြထားတဲ့အတိုင်း တွေ့ရမှာပါ။

Animating Boxes
ဂိမ်းထဲမှာ Obstacle အဖြစ်ထားမယ့် spike မှာ sliding animation ထည့်ပါမယ်။
#spike {
    ...
    animation: sliding 3s linear infinite;
}
@keyframes sliding {
    0% { left: 2000px; }
    100% { left: -100px; }
}
ဒီတစ်ခါမှာတော့ dino ကို Jumping animation ထည့်ပါမယ်။
#dino {
    ...
    animation: jumping 1s linear infinite;
    /*set to 'none' after testing*/
}
@keyframes jumping {
    25% { bottom: 100px; }
    50% { bottom: 200px; }
    75% { bottom: 200px; }
}
Jumping animation ကို စိတ်တိုင်းကျပြီဆိုရင် none ထားပေးလိုက်ပါ။ နောက်မှ JS ထဲကနေ ပြန်သုံးမှာပါ။ ဒီဂိမ်းအတွက် HTML CSS က ဒီလောက်ဆို ရပါပြီ။
Game Mechanics in JS
Game window ကို ဆွဲပြီးပြီဆိုတော့ လိုအပ်တဲ့ Game mechanic တွေကို JS ထဲမှာ ရေးပါမယ်။
Getting HTML elements
အရင်ဆုံး JS ထဲကနေ ထိန်းချုပ်ရမယ့် Element တွေကို ယူရပါမယ်။
var dino = document.getElementById("dino");
var spike = document.getElementById("spike");
var score = document.getElementById("score");
var hiscore = document.getElementById("hiscore");
// Flags for checking game states
var isHit = false;
var isJumping = false;
Jumping T-rex
Player က Mouse-click လုပ်လိုက်ရင် ခုန်ဖို့အတွက် HTML ထဲက Body tag မှာ ဒီလိုထည့်လိုက်ပါ။
...
<body onclick="jump();">
...
ပြီးရင် Jumping animation ပြောင်းပေးတဲ့ Function တစ်ခုရေးပါမယ်။
function jump () {
    if (isHit || isJumping) return
    isJumping = true;
    dino.style.animation = "jumping 800ms linear";
    setTimeout(function(){
        isJumping = false;
        dino.style.animation = "none";
    }, 1000);
}
isHit နဲ့ isJumping နှစ်ခုထဲက တစ်ခု true ဖြစ်တာနဲ့ အောက်က ကုဒ်တွေ ဆက်မ run ပဲ return လုပ်မှာပါ။ ဒါက ဘယ်အခြေအနေမှာ ခုန်လို့ရတယ်ဆိုတာကို ကန့်သတ်ထားတာပါ။ Function jump ကို ဒီနေရာမှာတင် ရပ်ထားပြီး Browser ထဲမှာ စမ်းကြည့်လိုက်ရင် တစ်ခါခုန်လို့ ရပေမယ့် ထပ်ခုန်လို့ မရတော့ပါဘူး။ ထပ်ခုန်နိုင်ဖို့အတွက် isJumping နဲ့ animation ကို မူလအတိုင်း ပြန်ပြောင်းပေးဖို့လိုနေတာပါ။ setTimeout-function က ပေးထားတဲ့ Millieseconds ကြာတဲ့ အခါမှာ ပေးထားတဲ့ Function ကို run ပေးပါတယ်။ Function တစ်ခုကို ချက်ချင်း မ run သေးပဲ ခဏစောင့်ခိုင်းထားတဲ့ သဘောပါ။ ဒီတော့ Jumping animation ပြီးတဲ့အခါမှာ reset ပြန်လုပ်ပေးတဲ့ Function တစ်ခုထည့်လိုက်ပါတယ်။ ဒီလိုဆိုရင် တစ်ခါခုန်ပြီးတိုင်း animation နဲ့ variable ကို reset ပြန်လုပ်ပေးတဲ့ အတွက် ထပ်ပြီးခုန်လို့ ရသွားပါပြီ။
Session Storage
Score နဲ့ Highscore တွေကို သိမ်းဖို့အတွက် Session Storage ကို သုံးပါမယ်။ Session Storage က Data တွေကို Browser မပိတ်ခင်အထိ သိမ်းပေးပါတယ်။ Page ကို refresh လုပ်လိုက်လည်း Data တွေက ပျက်မသွားပါဘူး။ ဒီ Feature က Highscore တွေကို သိမ်းဖို့အတွက် အသုံးဝင်ပါတယ်။
sessionStorage.score = 0;
sessionStorage.hiscore = sessionStorage.hiscore || 0;
sessionStorage.hiscore က အရင်တန်ဖိုးရှိပြီးသားဆိုရင် အဲဒီတန်ဖိုးအတိုင်းထားပြီး မရှိသေးရင်တော့ zero ပဲထားပါတယ်။ Score update လုပ်ဖို့ Function တစ်ခုကို ရေးပါမယ်။
function updateScore () {
    if (!(isHit)) {
        sessionStorage.score = Number(sessionStorage.score) + 0.01;
        if (Number(sessionStorage.score) > Number(sessionStorage.hiscore)) {
            sessionStorage.hiscore = sessionStorage.score;
        }
    }
    score.innerHTML = "Score: " + Math.floor(sessionStorage.score);
    hiscore.innerHTML = "Best: " + Math.floor(sessionStorage.hiscore);
}
ဒီ Function မှာတော့ Player က တစ်ခုခုနဲ့ မတိုက်မချင်း Score ကို အချိန်အလိုက် တိုးပေးပါတယ်။ Scoring system ကို ကိုယ်နှစ်သက်သလို ပြောင်းရေးနိုင်ပါတယ်။ ပြီးရင် Score တွေကို HTML ထဲမှာ တစ်ခါတည်း ပြပေးပါတယ်။
Collision Detections
ဒါကတော့ Collision ဖြစ်၊ မဖြစ် စစ်ပြီး Game over လုပ်ပေးတဲ့ Function ပါ။
function updateGame () {
    var dinoBottom = parseInt(window.getComputedStyle(dino).getPropertyValue("bottom"));
    var dinoLeft = parseInt(window.getComputedStyle(dino).getPropertyValue("left"));
    var dinoWidth = parseInt(window.getComputedStyle(dino).getPropertyValue("width"));
    var spikeLeft = parseInt(window.getComputedStyle(spike).getPropertyValue("left"));
    if ( spikeLeft < (dinoLeft+dinoWidth) && spikeLeft > dinoLeft && dinoBottom <= 100 ) {
        isHit = true;
        gameOver();
    }
    }
    updateScore();
}
function gameOver () {
    dino.style.animation = "none";
    spike.style.animationPlayState = "paused";
    info.style.color = "#cd201f";
    info.innerHTML = "<h1>Game Over</h1>";
}
UpdateGame က ဂိမ်းတစ်ခုလုံးမှာ အမြဲ run နေမယ့် Function ပါ။ အပေါ်ဆုံးက variable တွေက Collision စစ်ဆေးတဲ့ နေရာမှာ သုံးမယ့် တန်ဖိုးတွေ ဖြစ်ပါတယ်။ Box နှစ်ခု တိုက်သွားပြီဆိုရင် animation တွေ အကုန်ရပ်ပေးတဲ့ gameOver-function ကို ခေါ် ပါတယ်။ Update တစ်ခါလုပ်တိုင်း updateScore-function ကို ခေါ်ထားပါတယ်။
ဒီ updateGame-function ကို အမြဲ run နေစေဖို့ Function တွေရဲ့ အပြင်မှာ ဒီလိုရေးလိုက်ပါ။
setInterval(updateGame, 10);
setInterval က setTimeout လို တစ်ခါတည်း run တာမဟုတ်ဘဲ ပေးထားတဲ့ အချိန်တစ်ခုကြာတိုင်း ထပ် run နေမှာပါ။ အခုဆိုရင် Game mechanic တွေ အကုန်ပြီးပြီဖြစ်လို့ Endless platformer game လေးတစ်ခုကို ကစားနိုင်ပါပြီ။
Adding More Fun
ဂိမ်းဆော့ရတာ ပိုပြီး ပျော်စရာကောင်းအောင် ပုံနဲ့ Animation တွေ ထည့်ပါမယ်။ အရင်ဆုံး dino နဲ့ spike ကို background image ပြောင်းပါမယ်။
#dino {
    ...
    /*background: #25d366;*/
    background: url('assets/run1.png') no-repeat left bottom / contain;
    ...
}
#spike {
    ...
    /*background: #cd201f;*/
    background: url('assets/cactus.png') no-repeat left bottom / contain;
    ...
}
နောက်ခံပုံနဲ့ animation ကို bg-div မှာ ထည့်ပါမယ်။
#bg {
    width: 100%;
    height: 100%;
    background: url('assets/clouds.png') no-repeat left top / contain ;
    position: absolute;
    left: 0;
    top: 0;
    animation: parallax 30s linear infinite;
}
@keyframes parallax {
    0% {transform: translateX(100%);}
    100% { transform: translateX(-100%); }
}
ဒါဆိုရင် နောက်မှာ Sliding ဖြစ်နေတဲ့ background တစ်ခု ရပါပြီ။ ပြီးရင် T-rex ကလေး ပြေးနေတဲ့ animation ထည့်ပါမယ်။
#dino {
    ...
    animation: walking 500ms steps(1, end) infinite;
}
@keyframes walking {
    0% { background-image: url('assets/run1.png'); }
    33% { background-image: url('assets/run2.png'); }
    66% { background-image: url('assets/run3.png'); }
}
ဒါကိုထည့်လိုက်ရင် T-rex ကလေး စပြေးပါလိမ့်မယ်။ ဒီနေရာမှာ သတိထားရမှာက animation name ကို running လို့ ပေးလို့မရပါဘူး။
JS ထဲက jump-function မှာ animation ကို none အစား walking animation ပြန်ပြောင်းပေးလိုက်ပါ။ ဒီလို မပြောင်းဘဲထားရင် တစ်ခါခုန်ပြီး ဆက်မပြေးတော့ပါဘူး။
function jump () {
    ...
    setTimeout(function(){
        ...
        dino.style.animation = "walking 500ms steps(1, end) infinite";
    }, 1000)
}
Game over ဖြစ်သွားရင် bg-animation ကို ရပ်ဖို့ နဲ့ ပုံပြောင်းပေးဖို့အတွက် gameOver-function ထဲမှာ ဒီလိုထည့်လိုက်ပါ။
function gameOver () {
    ...
    document.getElementById('bg').style.animationPlayState = "paused";
    dino.style.backgroundImage = "url('assets/dead.png')";
    }
}
ဒါကတော့ ဂိမ်းရဲ့ အပြီးသတ် ပုံစံပါ။

ဒီအဆင့်ထိ ရောက်ရင်တော့ ကျွန်တော်တို့ရဲ့ Jumping T-rex ဂိမ်းလေး ဖန်တီးလို့ ပြီးပါပြီ။ နောက်တစ်ဆင့်မှာတော့ ဒီဂိမ်းလေးကို သူငယ်ချင်းတွေနဲ့ Share လို့ ရအောင် Github ပေါ်ကို တင်မှာ ဖြစ်ပါတယ်။
Hosting on Github page
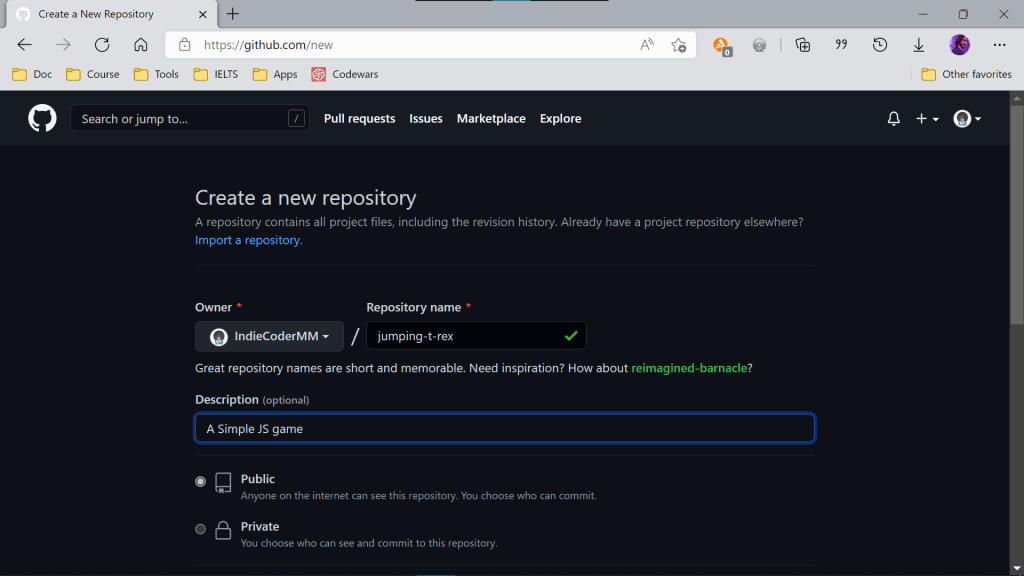
Browser ထဲကနေ github.com/new ကို သွားလိုက်ပါ။ ကိုယ့်မှာ Account မရှိသေးရင် Sign Up လုပ်ပါ။ Create a new Repository Page ကို ရောက်သွားပါမယ်။ Repo name နဲ့ Description ထည့်လိုက်ပါ။
ပြီးရင် Create Repository ကို နှိပ်ပါ။ အောက်မှာ ပြထားတဲ့ Page ကို ရောက်ပြီဆိုရင် Uploading an existing file ကို နှိပ်ပါ။
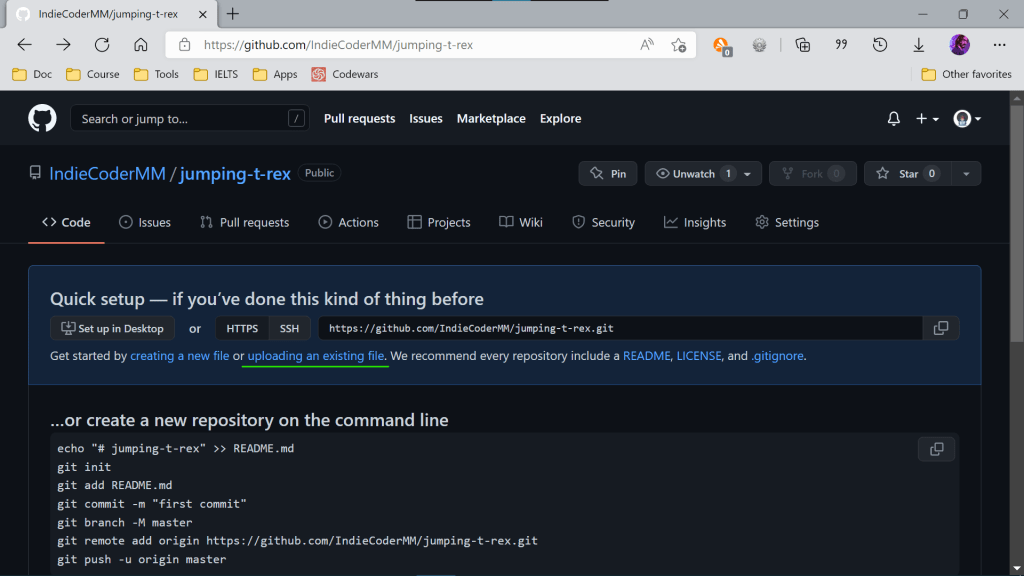
Choose your files ကိုနှိပ်ပြီး Project folder ထဲက File တွေကို ထည့်လိုက်ပါ။ အကုန် Upload လုပ်ပြီးရင် Commit changes ကို နှိပ်လိုက်ပါ။ Repo ထဲကို File တွေ ရောက်သွားပါလိမ့်မယ်။

Github page ကို ဖွင့်ဖို့ အတွက် Setting > Pages ကို သွားပါ။ ပြီးရင် Source မှာ Repo branch ကို select လုပ်ပြီး Save လိုက်ပါ။
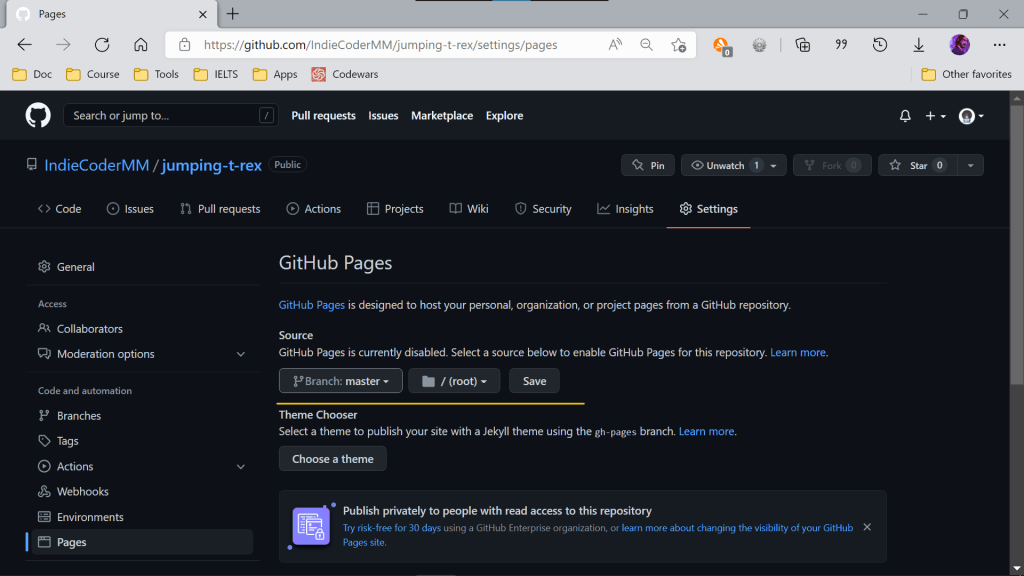
Your site is ready to be published at ဆိုပြီး Link တစ်ခုပေါ်လာပါလိမ့်မယ်။ အဲဒီ Link ထဲကို ဝင်လိုက်ပါ။ 404 File not found error page ကြီး ပေါ်လာပါလိမ့်မယ်။ အပေါ်က Link နောက်မှာ ကိုယ်ရေးထားတဲ့ HTML filename ထပ်ထည့်လိုက်ပါ။ Filename က index.html ဆိုရင် Link နောက်မှာ …./index.html ဆိုပြီး ထည့်လိုက်ပါ။ ဂိမ်းလေးပေါ်လာပါလိမ့်မယ်။ ဒါဆိုရင် သူငယ်ချင်းတွေနဲ့ ဒီ Link လေးကို Share ပြီး ဆော့လို့ရပါပြီ။
Conclusion
ဒါဆိုရင် ကျွန်တော်တို့ရဲ့ Game Project လေးကို တည်ဆောက်လို့ ပြီးပါပြီ။ ဒီဂိမ်းလေးမှာဆိုရင် JS နဲ့ Webpage ကို ထိန်းချုပ်နည်း၊ Web ပေါ်မှာ Storage ပြုလုပ်နည်း၊ ကိုယ့်ရဲ့ Website ကို Github page မှာ တင်နည်းစတဲ့ Web Development အခြေခံတွေ အပြင် Game တစ်ခုဖန်တီးရာမှာ လိုအပ်တဲ့ Collision detection၊ Scoring system နဲ့ Game state အမျိုးမျိုး ပြောင်းလဲပုံတွေကိုပါ လေ့လာခဲ့ကြတာ ဖြစ်ပါတယ်။
ဒီဂိမ်းလေးကို ဒီမှာတင် ရပ်မထားဘဲ ကိုယ်ထည့်ချင်တဲ့ Feature တွေ၊ Level တွေ ထပ်ထည့်ကြည့်ပါ။ ဒီလိုကိုယ်တိုင် လေ့ကျင့်ဖြစ်မှ Skill တွေက တဖြည်းဖြည်း တိုးတက်လာမှာပါ။ Practice များရင် Progress ဖြစ်လာမှာ သေချာပါတယ်။
အပေါ်မှာ ရှင်းပြတဲ့ အတိုင်း လိုက်လုပ်ကြည့်လို့ အဆင်မပြေတာရှိရင် အောက်က Comment မှာ ဖြစ်ဖြစ်၊ Facebook မှာ ဖြစ်ဖြစ် ဆက်သွယ်မေးမြန်းနိုင်ပါတယ်။ အမှားပါနေရင်လည်း ပြန်ပြင်ပေးပါ့မယ်။

![Snake Game in Python [2]: Beginner Pygame Tutorial](https://indiecodermyanmar.tech.blog/wp-content/uploads/2022/08/snake_cover.png?w=712)
